Minikube Introduction and Tutorial
Posted on December 4, 2022 • 11 minutes • 2260 words
Start Kubernetes clusters with a single command.
When you want to learn, develop or try out new things on Kubernetes, you need a Kubernetes cluster. With minikube you get a local Kubernetes cluster with a single command. You can use it within about a minute and stop it and delete it at the end. In this introduction, you will learn:
- How Minikube works
- How to use minikube to deploy an existing app
- How to build and deploy a self-developed app with minikube
Let’s get started.
How Minikube Works
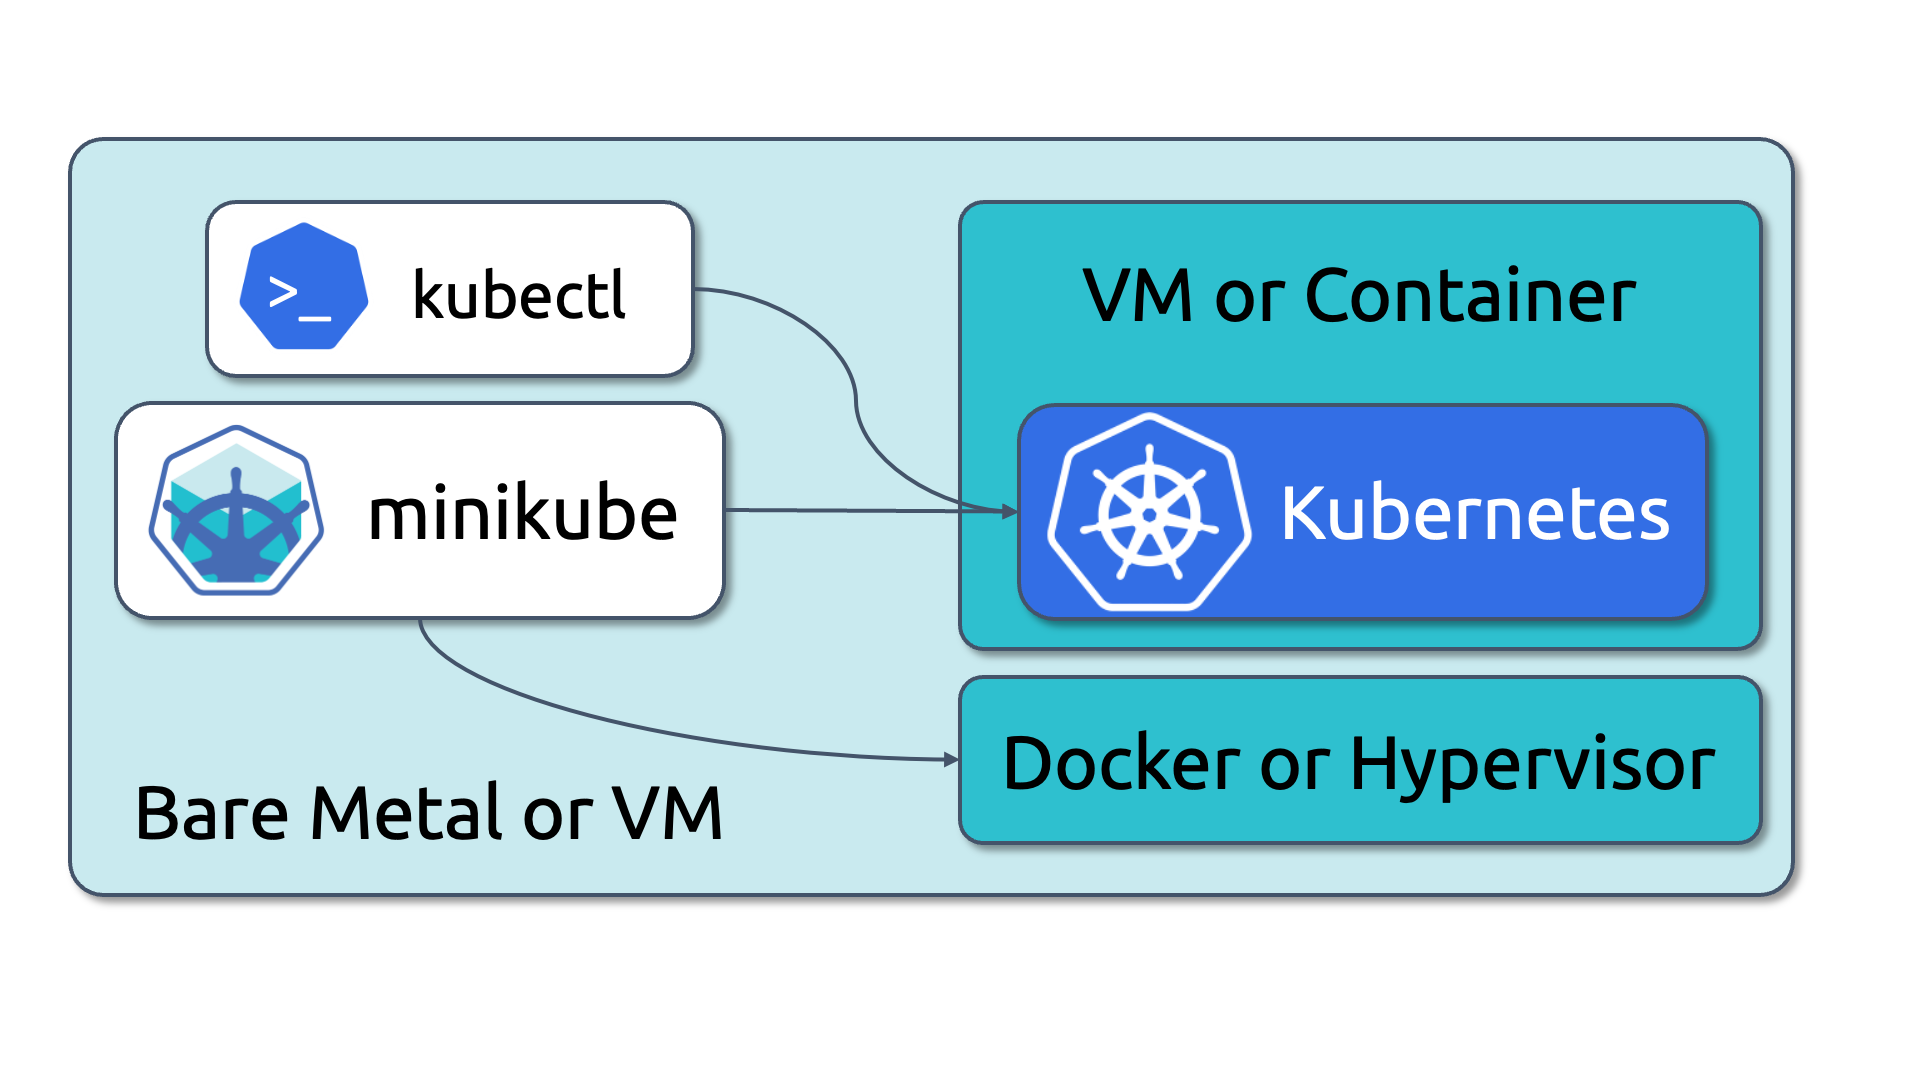
minikube is a command line tool available for Linux, Macos and Windows. It has drivers which control a hypervisor or a container runtime to start a virtual machine or a container with Kubernetes inside.
Installing minikube
When you look at the drivers section of the minikube documentation you see which drivers are supported. Docker is the only preferred driver that is supported on all platforms: Linux, macOS and Linux. To use it, install Docker Desktop and then download and install minikube. Installing kubectl is optional but simplifies using minikube.
Now you can start minikube clusters with minikube start --driver docker. To make docker the default driver, enter the following command:
minikube config set driver docker
After installation you can check if minikube is working by starting a cluster:
minikube start
When the Kubernetes cluster is started, you can use the minikube command line tool to manage and interact with the cluster.
Here are the basic minikube commands:
# Start a cluster
minikube start
# get cluster state
minikube status
# pause a cluster
minikube pause
# unpause a cluster
minikube unpause
# stop a cluster
minikube stop
# delete a cluster
minikube delete
kubeconfig and kubectl
minikube reconfigures the kubeconfig file on your desktop. With this, you can also manage your cluster with kubectl or other tools such as Lens. If kubectl is not installed locally, minikube makes kubectl available with the minikube kubectl subcommand. So with kubectl installed, these two commands should be equivalent:
# use local kubectl
kubectl get pods
# use minikube-provided kubectl
minikube kubectl -- get pods
Persistent Configuration
When you have installed and used minikube, you will find a .minikube folder in your home directory. In this folder, minikube keeps a persistent configuration and caches images. In the example above, we have defined docker as the default driver in the persistent configuration.
Here are basic commands to deal with the persistent configuration:
# view defined values
minikube config view
# list configurable parameters
minikube config list
# list available values for a parameter
minikube config defaults PROPERTY_NAME
# two examples
minikube config defaults driver
minikube config defaults kubernetes-version
# set a value:
minikube config set PROPERTY_NAME VALUE
# an example:
minikube config set driver virtualbox
Minikube Profiles
Minikube cluster configurations are called profiles. With profiles, you can create and manage multiple clusters. Profiles are selected with the -p command line flag on minikube commands. When you start a minikube cluster without a profile, it starts the default minikube profile cluster. The minikube profile subcommands provide basic management functions for profiles. minikube clusters are isolated from each other by default but you can make them available on a shared network if required.
Here are basic commands to manage and use profiles:
# minikube start creates a cluster with a default profile
minikube start
# get current profile
minikube profile
# start a second cluster with a new profile
minikube start -p cluster2 --memory=4g --cpus=2
# list profiles
minikube profile list
# set a profile
minikube profile cluster2
# deleting a cluster deletes the profile, too
# here, cluster2 is deleted as it was selected
minikube delete
Minikube Addons
minikube also has some addons. With these, you can quickly add functionality, such as the Kubernetes Dashboard. Here is how you can activate the dashboard addon and access the dasboard:
1. See available addons
minikube addons list
2. Activate an addon with for example the Kubernetes Dashboard
minikube addons enable dashboard
It tells us to activate the metrics-server addons for all features. Let’s do it
minikube addons enable metrics-addon
3. open the dasboard
minikube dashboard
This opens the dashboard in the default browser on your system. It also creates a proxy to the service within minikube. Note that this proxy must stay open to be able to access the dashboard.
Tunnel Services with Minikube
Another important feature is that minikube can create a tunnel to services running in minikube. The command to open a tunnel to an individual service is minikube service. For example, the following command opens a tunnel to the service demo and prints the url: minikube service demo --url. To open tunnels to all potentially reachable services use the command minikube tunnel. By default, only services of type NodePort are reachable. To cleanup orphaned tunnels use minikube tunnel --cleanup. Tunnels can become orphaned if a cluster ist stopped when a tunnel is open. In effect routes are not deleted.
Basic Minikube Usage: Deploying an existing app to minikube
This tutorial is a basic walk through of minikube. You will learn how to
- start a minikube cluster,
- run and expose a deplyoment, and
- stop and delete the cluster.
A prerequisite is that you have minikube installed on your system. Please refer to the minikube documention to learn how to install it.
# 1. start a cluster
minikube start
# 2. check if we have some content
minikube kubectl -- get nodes,ns
# 3. create a namespace
minikube kubectl -- create ns hello
# 4. create a deployment
kubectl -n hello create deployment hello \
  --image gcr.io/kuar-demo/kuard-arm64:purple
# 5. check if pods are ready
kubectl -n hello get pods
# 6. expose the deployment
kubectl -n hello expose deployment hello \
  --type=NodePort \
  --port=8080
# 7. check if service is ready
kubectl -n hello get service hello
# 8. open a tunnel to make this service available on your desktop
#    then open the url in your browser
minikube service -n hello hello --url
# 9. use ctrl+c to close the browser
# 10. start the dashboard and open it in a browser
minikube dashboard
# 11. delete the namespace
kubectl delete ns hello
# 12. stop and delete the cluster
minikube delete
Working with Container Images in Minikube
Minikube supports multiple ways of pushing images to a cluster . One of theses ways are provided by the minikube image subcommands. They forward the command to the container runtime that is provided by minikube. This simplifies working with images in minikube.
Here are examples of what you can do with the minikube image subcommands:
# download a container image directly from a remote registry
minikube image pull busybox
# upload a container image directly to a remote registry
minikube image push busybox
# take an image that is available as an archive
# and make it available in the cluster
minikube image load myimage.tar
# save an image into an archive
minikube image save myimage myimage.tar
# build a new image based on a build context
# ie. a directory with Dockerfile in the cluster
minikube image build -t myimage .
# tag an image
minikube image tag myimage:latest myimage:1.0.0
# list images
minikube image ls
# remove an image
minikube image rm myimage
# see list of available image commands
minikube image --help
# get help for a command
minikube image build --help
This can be used to build and deploy a self-developed application to minikube as is shown in the next tutorial.
Build and Test a self-developed Application with Minikube
This tutorial shows how to use minikube to build and test an application.
# 1. clone the example application
git clone github.com/mitja/flask-example
# 2. change into the flask-demo directory
cd flask-example
# 3. start minikube
minikube start -p flask-example
# 4. Build an image
minikube -p flask-example image build -t flask-example .
# 5. Deploy the image
#    Note: *imagePullPolicy: Never* is necessary to run
#    the image without pushing it to a container registry
minikube -p flask-example kubectl -- apply -f deployment.yml
# 6. expose the service and check that its running
minikube -p flask-example service flask-example-service --url
# 7. start a shell container to check from within the cluster
minikube -p flask-example kubectl -- \
  run my-shell --rm -i --tty \
  --image curlimages/curl -- sh
# 8. in the pod shell, use curl to test the service
curl flask-example-service:5000
# 9. exit the shell and delete the shell pod:
exit
# 10. delete the cluster
minikube delete -p flask-example
Publishing a Web Service with an Ingress Controller
This tutorial shows how to publish a service with an Ingress. Ingress is a special Kubernetes API resource. You use it to publish http services. An Ingress must be implemented by an ingress controller . Kubernetes does not come with a default one, but there are a few very common ingress controllers. Minikube for example provides ingress-nginx as an addon .
An Ingress is like a reverse proxy which you can configure with the standard Ingress resource definition in Kubernetes. Like a reverse proxy, an Ingress can terminate TLS and route traffic to upstream services based on http attributes such as hostnames and URL path segments. An ingress is also an additional layer of security: Instead of exposing application services directly to the internet, you only expose the ingress service such as Nginx in case of minikube. To further improve security, ingresses can also implement Web Application Firewall functionality (eg. mod_security is supported by ingress nginx) and rate limiting among other features. You can use just one ingress (or as few as you like) to publish many different services without giving each service its own NodePort. Finally you can run ingresses on separate nodes.
1. Activate the ingress addon
minikube addons enable ingress
2. Check the ingress services and pods
The pods and services for ingress are deployed in the ingress-nginx namespace:
kubectl get pod,service -n ingress-nginx
3. deploy an example app
kubectl create deployment web --image=gcr.io/google-samples/hello-app:1.0
4. expose the app as a service of type NodePort
kubectl expose deployment web --type=NodePort --port=8080
5. check the service
On minikube, open a tunnel and view in the browser (open the url provided as output of this command):
minikube service web --url
6. create an ingress definition
Create the file example-ingress.yaml with this content:
apiVersion: networking.k8s.io/v1
kind: Ingress
metadata:
  name: example-ingress
  annotations:
    nginx.ingress.kubernetes.io/rewrite-target: /$1
spec:
  rules:
    - host: hello-world.info
      http:
        paths:
          - path: /
            pathType: Prefix
            backend:
              service:
                name: web
                port:
                  number: 8080
apply it to your cluster:
kubectl apply -f example-ingress.yaml
The annotation says:
Any substrings within the request URI that need to be passed to the rewritten path must explicitly be defined in a capture group. As we do not use rewriting in this example, I think this may be optional, but I have not tried it. It could be used to differntiate by path rewriting a special base path from the external perspective to a root path from the internal service perspective, for example.
Another important rewrite annotation is a redirect from http to https.
The rule says:
- for host hello-world.info…
- and path prefixed with / (all paths)
- send the request to backend service named web, on port 8080
Minikube needs a tunnel to reach the ingress from your desktop. In addition, the ingress routs based on hostnames. So you will need to add the hostname to your hosts file.
7. See where the ingress address is located
kubectl get ingress
In our example it is identical to the ip of the (single-node) minikube cluster:
minikube ip
These are the IPs of the VM or container in your hypervisor or docker network. To reach the service with minikube, you need to tunnel it.
8. add following line to your /etc/hosts file
127.0.0.1 hello-world.info
9. start the minikube tunnel
Note that you need admin rights to start a tunnel for the ingress service which is listening on port 80 and 443.
minikube tunnel
10. open the example app in the browser
open http://hello-world.info in your browser. You shoud see the example app. If you have curl, you can also run the following command to test it.
curl hello-world.info
Cleaning up and Summary
This concludes this tutorial and introduction to minikube. To clean up:
1. delete the cluster
minikube delete
**2. delete the following entry in /etc/hosts:
127.0.0.1 hello-world.info
Here are some other examples of what you can do with minikube:
-
use it with and without locally installed kubectl: By default, kubectl gets configured to access the kubernetes cluster control plane inside minikube when the minikube start command is executed. With this, you can use minikube with other tools, too.
-
use a private registry with the registry addon.
-
start a cluster with specific Kubernetes version:
minikube start -p oldcluster --kubernetes-version=v1.24.9 -
start a cluster with defined cpu and ram and reachable in network:
minikube start -knativedemo --cpus 6 --memory 8000 --listen-address=0.0.0.0 -
mount directories in minikube and use them as volume mounts in pods
-
use ingress-dns to make the services directly available from local host without tunnel
-
Use it as a step in your CI/CD pipeline, such as GitHub Actions or with other tools described in continuous integration
-
use OpenID Authentication for the kubeapi-server in Minikube . See example with Okta: How to Secure Your Kubernetes Cluster with OpenID Connect and RBAC , combine it to use Kubelogin with Dex and Active Directory or Samba LDAP