Linkerd Introduction and Tutorial
Posted on December 30, 2022 • 6 minutes • 1112 words
Secure communication in Kubernetes clusters.
When you want to securely connect microservices in a Kubernetes cluster you need to take care of many things, for example:
- encryption
- authentication with mutual TLS
- providing a a certificate authority and handling certificate issuing and renewal
- applying authorization polices on application level (layer 7)
A service mesh can simplify these tasks. Linkerd is a service mesh that is particularly easy to use. With linkerd, you do not need to learn special Kubernetes Cluster Resource Definitions (CRDs) for mTLS secured communication. You can simply activate the service mesh with annotations.
In contrast to most other service meshes, Linkerd does not use Envoy proxy on the data plane. Instead, Linkerd comes with its own proxy, called linkerd2-proxy. This is implemented in Rust and only provides the features necessary for a service mesh. It is also not meant to be used as an individual component. As a result, the data plane is easy to use, fast, lightweight and secure.
How Linkerd Works
Linkerd has a control plan, a data plane and a cli. Here is a big picture of Linkerd:
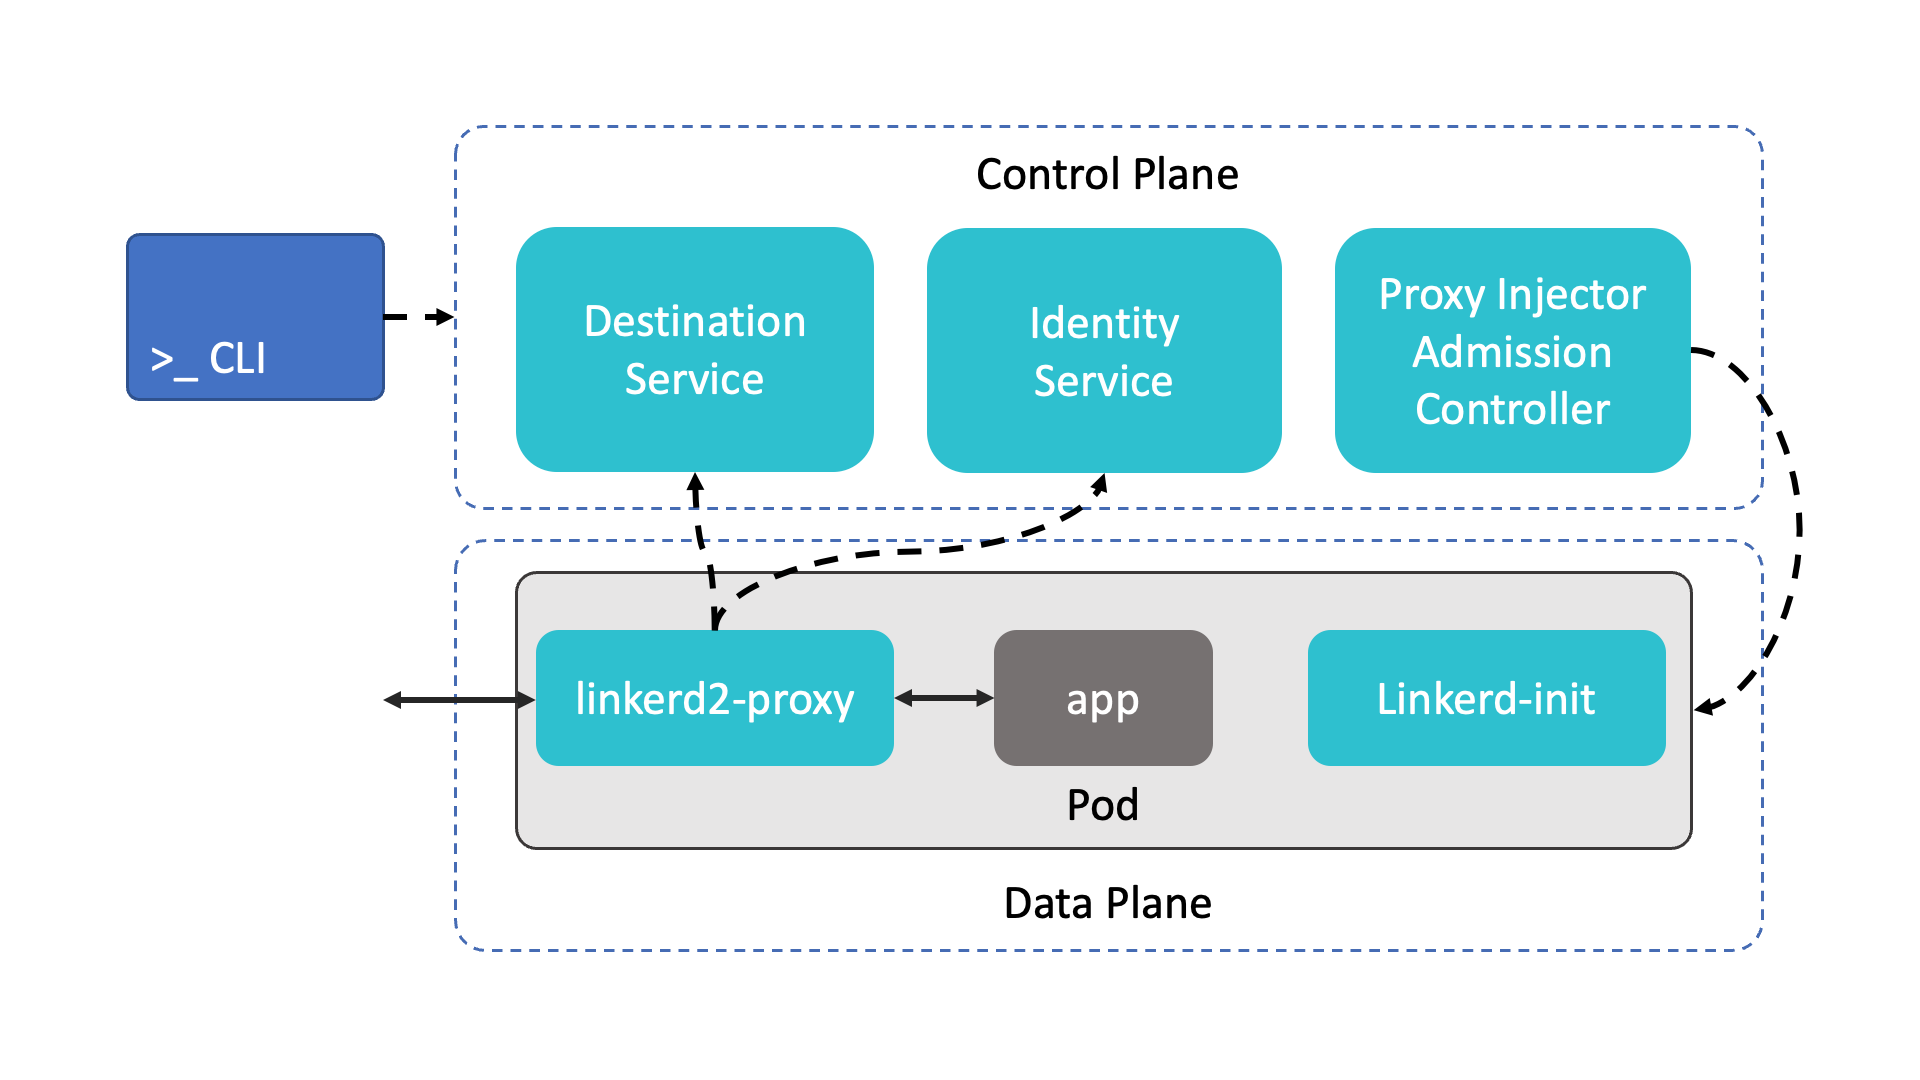
The control plane consists of three services in the linkerd namespace:
- the destination service defines the behaviour of the data plane, such as how requests are routed and which is the correct TLS identity of the communication partner
- the identity service is a TLS certificate authority that issues TLS certificates to proxies in the data plane
- the proxy injector is a Kubernetes admission controller. It watches for resources with the annotation linkerd.io/inject: enabled and adds the data plane sidecars and the initial configuration to pods of the application.
The data plane consists of two containers that the proxy injector adds to the pods of the application:
- the proxy-init container runs before any other containers of the pod are started and uses iptables to route traffic through the proxy and provides the initial configuration.
- the linkerd2-proxy container is a lightweight service mesh proxy
The cli is used to install, check and interact with the service mesh. Here are some of its functions:
# check cluster before installation
linkerd check --pre
# install Linkerd on a cluster
linkerd install --crds | kubectl apply -f -
linkerd install | kubectl apply -f -
# check cluster after installation
linkerd check
# inject the annotation to enable the service mesh for a deployment
kubectl get -n NAMESPACE deploy -o yaml \
  | linkerd inject - \
  | kubectl apply -f -
# check data plane
linkerd -n NAMESPACE check --proxy
# install the viz built-in extension
linkerd viz install | kubectl apply -f -
# show the dasboard
linkerd viz dashboard
Linkerd comes with some extensions that provide additional functionality, for example:
- viz: adds observability and visualization components for Linkerd
- jaeger: adds distributed tracing functionality to Linkerd using OpenTelemetry collector and Jaeger
- multicluster: enables multicluster support for Linkerd
- tapshark: adds a tool for troubleshooting. This is a Wireshark inspired ncurses-style CLI for Linkerd Tap
Tutorial: Getting Started with Linkerd
This tutorial shows how to install Linkerd and enable mTLS on a service. It also shows how to install and open the Linkerd dashboard. This tutorial is based on the Getting Started guide of the Linkerd documentation. It has been adapted to run with Minikube and Docker and shows what the Linkerd inject command does with the deployment manifest. If you want to learn more about what is going on in each of the steps please refer to the getting started guide.
# 1. install Linkerd, eg. with Homebrew on a Mac:
brew install linkerd
# 2. have a Kubernetes ready to use
#    eg. start and select a cluster with minikube
minikube start -p linkerd
minikube profile linkerd
# 3. check that the cluster can be used for Linkerd
linkerd check --pre
# 4. install linkerd CRDs
linkerd install --crds | kubectl apply -f -
# 5. install Linkerd; note: if docker is used
#    as container runtime this flag is required:
#    --set proxyInit.runAsRoot=true
linkerd install --set proxyInit.runAsRoot=true | kubectl apply -f -
# 6. check installation, wait until all status checks are green
linkerd check
# 7. install the demo app
curl --proto '=https' --tlsv1.2 \
  -sSfL https://run.linkerd.io/emojivoto.yml \
  | kubectl apply -f -
# 8. forward the port of the demo app service
kubectl -n emojivoto port-forward svc/web-svc 8080:80
# 9. open the browser at http://localhost:8080
#    then use ctrl+c to close the forwarding
# --
# 10. save the deployment manifest in a temp file
kubectl get -n emojivoto deploy -o yaml > /tmp/a.yaml
# 11. inject and  save the result in another temp file
kubectl get -n emojivoto deploy -o yaml \
  | linkerd inject - > /tmp/b.yaml
# 12. use diff to compare the two temp files
#     you will see that only one annotation has been added:
#         annotations:
#           linkerd.io/inject: enabled
diff /tmp/a.yaml /tmp/b.yaml
# 13. delete the temp files
rm /tmp/a.yaml /tmp/b.yaml
# 14. apply the injection in one command
kubectl get -n emojivoto deploy -o yaml \
  | linkerd inject - \
  | kubectl apply -f -
# 15. check the data plane
linkerd -n NAMESPACE check --proxy
# 16. port forward, again and open the browser at
#     http://localhost:8080
kubectl -n emojivoto port-forward svc/web-svc 8080:80
# 17. use ctrl+c to close the forwarding
# --
# 18. install the Linkerd dashboard and on-cluster metrics stack
linkerd viz install | kubectl apply -f -
# 19. check the installation
linkerd check
# 20. open the Linkerd dashboard
linkerd viz dashboard
# 21. explore the dashboard,
#     you can eg. see status infos (an error) and metrics
# --
# 22. use ctrl+c to close the dashboard
# --
# 23. delete the cluster
minikube delete -p linkerd
Other Linkerd Use Cases
In the getting started tutorial you have seen how to install Linkerd and enable basic mTLS secured communication. Here are some examples of other Linkerd use cases:
- Linkerd does not come with an ingress on its own to keep it simple. You can use existing Kubernetes ingress solutions to handle ingress traffic .
- Perform automatic canary releases with traffic splitting.
- Enable multi cluster communication . With this, services on each participating cluster can talk to services on any participating clusters.
- Use distributed tracing with Jaeger and OpenCensus. OpenTelemetry is not yet supported but will be supported when it is ready for production.
- View metrics with Grafana, using predefined dashboards.
- Enforce granular per route authorization policies .
- use Linkerd in a GitOps CD pipeline, for example Linkerd with ArgoCD .
- Proxy TCP traffic with protocol detection .