Issue and Renew TLS/HTTPS Certificates in Kubernetes with Autocert
Posted on January 6, 2023 • 7 minutes • 1427 words
If you want to secure TLS/HTTPS communication in a Kubernetes cluster, you have multiple options:
- You can use a full-blown service mesh but this comes with a lot of effort to deploy and manage.
- You can use an external certificate authority such as Let’s Encrypt and cert-manager but this adds an external dependency. With Let’s Encrypt you may also hit rate limits, especially on restarts during failover.
- You can deploy and manage a cluster-internal certificate authority and handle the issuing and renewal of certificates with a home grown solution – error-prone and cumbersome.
- You can also use Autocert which we will cover in this introduction.
Autocert provides a simple solution for cluster-internal mTLS. It handles certificate issuing and renewal and comes with its own certificate authority (Step CA). With Autocert, you just add an annotation to the resources that need certificates and Autocert does the rest. It issues the certificates, stores them in a volume mount and takes care of the renewal.
How Autocert Works
Autocert provides a mutating admission webhook and a certificate authority based on Step CA. The webhook intercepts and patches pod creation requests with some YAML to inject a bootstrapper and a renewer container into the pod which handle the obtaining and renewing of certificates from the certificate authority.
Here is a big picture of Autocert:
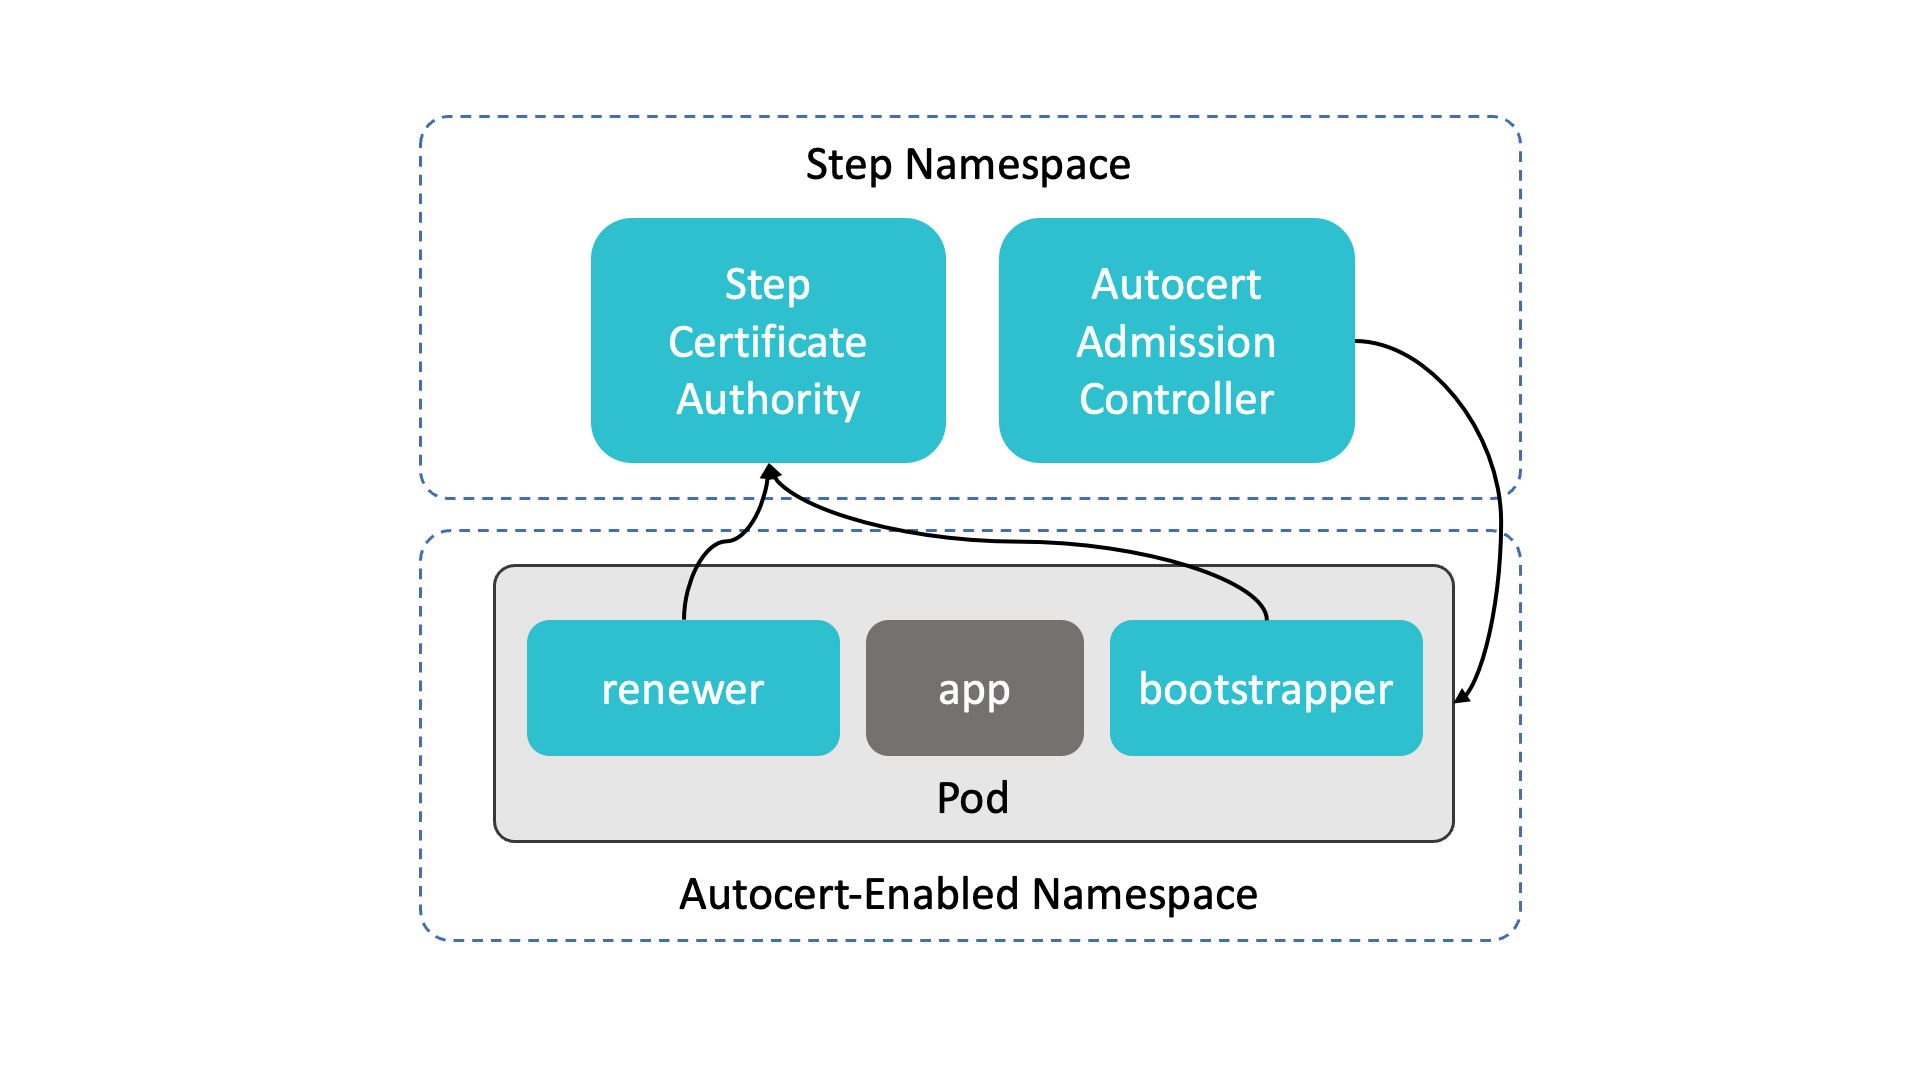
Autocert should be deployed in a separate namespace which is commonly named step. After installation, you will find the following pods and services in this namespace:
- autocert-step-certificates: This is the certificate authority.
- autocert: This is the the admission webhook
For bootstrapping, autocert uses the one-time token bootstrap protocol from Step CA to mutually authenticate a new pod with the certificate authority, and obtain a certificate. This goes like this:
- The one-time token is generated by the admission webhook and transmitted to the injected autocert-bootstrapper container via a Kubernetes secret.
- The autocert-bootstrapper container uses the one-time token to obtain a certificate at the certificate authority.
For renewal, the autocert-renewer sidecar simply uses mTLS with the not-yet-expired certificate for mTLS with the CA. Thus a valid certificate is required at all times to keep the service accessible. For example, if you stop a cluster and restart it after the certificate has expired, you need to run the deployment, again to reinitialize the process.
Following containers are injected to the pods:
- autocert-bootstrapper: This is an init container that generates a key pair and exchanges a bootstrap token for a certificate.
- autocert-renewer: This is a sidecar that renews certificates before they expire.
The certificate, the private key and the CA certificate are monted at /var/run/autocert.step.sm/.
Enabling and Configuring using Labels and Annotations
Autocert is enabled on per namespace basis with the following label:
kubectl label namespace default autocert.step.sm=enabled
Autocert certificate issuing and renewal is configured on a pod level with these annotations:
autocert.step.sm/name: hello-mtls-1h.default.svc.cluster.local
autocert.step.sm/duration: 1h
autocert.step.sm/owner: "999:999"
autocert.step.sm/mode: "0600"
Only the name annotation is required. All other annotations are optional.
Application configuration is not performed by autocert. Autocert only does the certificate handling. You need to take care that your application actually makes use of the certificates and enforces mTLS. This also means that servers need to be reloaded on certificate renewal.
Kubernetes RBAC
Autocert needs a cluster-wide permission to create and delete secrets. In effect any pod in the cluster can get a certificate with any identity. You may ask: How is that secure? Well, you can secure it on a higher level:
- Don’t give people kubectl access to your production clusters
- Use a deployment pipeline based on git artifacts
- Enforce code review on those git artifacts
If you find yourself in a position where you are trying to implement more fine grained controls you should consider using a service mesh. For example, if you want a service to accept only connections from clients in a certain namespace, you can configure the service to do so, for example by limiting the DNS names the service accepts connections from, but this quickly gets cumbersome. Moreover, you basically implement the authentication aspect in potentially multiple different ways depending on the applications you deploy. With a service mesh, you can do this in a consistent and unified way.
Commands for Management and Troubleshooting
Get the PKI secret (adjust the namespace as necessary):
kubectl get -n autocert \
  secret/autocert-step-certificates-ca-password \
  -o jsonpath='{.data.password}' | base64 --decode
Get the provisioner secret:
kubectl get -n autocert \
  secret/autocert-step-certificates-provisioner-password \
  -o jsonpath='{.data.password}' | base64 --decode
The initial configuration is done with a Kubernetes batch job. You can inspect its logs to get details such as the CA URL and the root certificate fingerprint:
kubectl -n autocert logs job.batch/autocert
Delete the configuration job:
kubectl -n autocert delete job.batch/autocert
Autocert Tutorial
This tutorial gives a quick introduction to autocert. You will learn
- how to install Autocert with Helm
- how to use Autocert by example of an Nginx server and a curl client.
You will need git, minikube, kubectl and Helm to follow this tutorial. Let’s go!
1. Create a test cluster.
minikube start autocert
2. Check that the admission webhook is enabled.
kubectl api-versions | grep "admissionregistration.k8s.io/v1"
3. Create a cluster role binding for the default service account with role cluster-admin.
kubectl create clusterrolebinding autocert-init-binding \
  --clusterrole cluster-admin \
  --user "system:serviceaccount:default:default"
4. Install autocert with Helm.
Helm is used as it is the recommended way of installing autocert.
helm repo add smallstep https://smallstep.github.io/helm-charts/
helm install autocert smallstep/autocert \
  -n autocert --create-namespace
5. Enable Autocert for a namespace.
You need to enable autocert per namespace by adding the label autocert.step.sm=enabled to the namespace. In this case we enable it for the default namespace and check if it is enabled.
kubectl label namespace default autocert.step.sm=enabled
kubectl get namespace -L autocert.step.sm
6. Clone the examples repository and change into the autocert directory.
This contains a client and server example. The server is based on Nginx, the client uses curl.
git clone https://github.com/mitja/cozykube-examples
cd cozykube-examples/introductions/autocert
7. Inspect the deployment manifests
Note that they contain the annotation autocert.step.sm/name.
cat nginx/hello-mtls.server.yaml | grep autocert.step.sm
cat curl/hello-mtls.client.yaml | grep autocert.step.sm
8. Take a look at the certwatch.sh file.
#!/bin/sh

while true; do
    inotifywait -e modify /var/run/autocert.step.sm/site.crt
    nginx -s reload
done
What does this file do?
This file watches the filesystem for changes and reloads Nginx when a new certficate has been issued.
9. Build and deploy the server.
cd nginx
minikube -p autocert image build \
  -f Dockerfile.server \
  -t hello-mtls-server-py-gunicorn .
kubectl apply -f hello-mtls.server.yaml
10. Check that everything is working by inspecting the rollout status.
kubectl rollout status hello-mtls
cd ..
11. Build and deploy the client.
cd curl
minikube -p autocert image build \
  -f Dockerfile.client \
  -t hello-mtls-client-curl .
kubectl apply -f hello-mtls.client.yaml
cd ..
12. List the certs of the server to see that they have been issued.
export HELLO_MTLS=$(kubectl get pods \
  -l app=hello-mtls \
  -o jsonpath='{$.items[0].metadata.name}' \
)
kubectl exec -it $HELLO_MTLS -c hello-mtls --
  ls /var/run/autocert.step.sm
13. Connect from the curl client to the server.
Use the issued certificate to authenticate at the server and the CA certificate to validate the server identity.
export HELLO_MTLS_CLIENT=$(kubectl get pods \
  -l app=hello-mtls-client \
  -o jsonpath='{$.items[0].metadata.name}' \
)
kubectl exec $HELLO_MTLS_CLIENT -c hello-mtls-client -- \
  curl -sS \
  --cacert /var/run/autocert.step.sm/root.crt \
  --cert /var/run/autocert.step.sm/site.crt \
  --key /var/run/autocert.step.sm/site.key \
  https://hello-mtls.default.svc.cluster.local
14. Provoke an error by connecting from the client without presenting its certificate.
The server should reject the connection.
kubectl exec $HELLO_MTLS_CLIENT \
  -c hello-mtls-client -- curl -sS \
  --cacert /var/run/autocert.step.sm/root.crt \
  https://hello-mtls.default.svc.cluster.local
15. Clean up by deleting the cluster
minikube delete -p autocert
This concludes the introduction tutorial to Autocert. In the tutorial you have seen the basic use case of autocert of mTLS in a cluster.
What else can you do with Autocert?
Here are some other Autocert use cases:
- Implement certificate authority federation for mTLS across multiple clusters or with external clients and servers
- use an own deployed Step CA leveraging some of its advanced features such as storing private keys in a hardware security module (HSM)
- use the Step CA cloud service for the certificate authority
Summary
Autocert is a simple and basic building block for TLS certificate issuing and renewal in Kubernetes clusters. It is can be a solution for implementing cluster-internal mTLS and can also federate to secure communication with cluster-external resources. It is not as feature-rich as a service mesh but also much easier to understand and manage. Here are links to more information about Autocert:
- Autocert GitHub Repository
- Autocert Installation
- Autocert Usage
- Autocert Runbook
- Autocert Examples Readme . This also gives a brief introduction to mTLS.
- Readme of the Autocert Helm Chart with configuration options.